Click here for MegaSquirt® MegaManual™ Information, Guides, and Links
MicroSquirt® Set-Up
This archive document primarily applies to older V2 and V1 MicroSquirt® controllers.
For the latest V3 MicroSquirt® controller documentation, click this link: V3 MicroSquirt® Quickstart Guide
Your MicroSquirt® EFI controller needs to be set up on 3 levels:
- Installation and Wiring - the physical setup,
- Tuning Software - to conform to your tuning PC computer,
- Tuning Parameters - to match the engine characteristics.
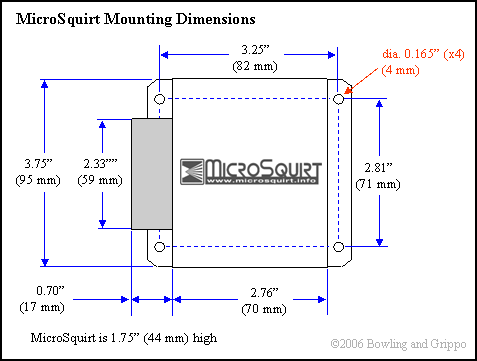
To install MicroSquirt® EFI controller, you will need to physically mount it on the vehicle. You can do that using the four mounting holes on the flange of the case. Be sure to allow enough room for the harness to plug into MicroSquirt.
The wiring instructions are here: MicroSquirt® Wiring Instructions, the tuning software set-up instructions follow, while the tuning parameters are discussed here: Configure/Tuning.
The tuning software for MicroSquirt®® EFI controllers is called MegaTune (it is used with all variants of MegaSquirt, including MicroSquirt). It will run on any computer that can run Window 98 or higher (WinMe, WinXP, WinVista). Ideally the computer will have a serial port (9-pin male connector), but many USB/Serial adapters have been used successfully. You can get the install file for MegaTune here:
To install MegaTune:
- Click on the above link and choose 'run' when the install program starts. The setup wizard will open.
- Click "Next>" to proceed with the installation.
- Select the destination location. The default is 'C:\Program Files\MegaSquirt'. Use this unless you have a good reason not to. Click 'Next>'.
- Select the 'Start' menu folder. The default is "MegaSquirt", use this or any other name you prefer. (Other helpful MegaSquirt programs use "MegaSquirt" as the default as well, so you might want to leave it as is). Click 'Next>'.
- You are now ready to install MegaTune. Review the files locations, then click 'Install' to proceed.
- The files will be installed in the specified locations.
- A 'readme' file will appear - review it carefully. It contains important information regarding how to set up MegaTune and MicroSquirt. You can re-read it at anytime from the MegaTune2.25 directory - it is called "README.txt", and can be viewed in any text editor.
- Click 'Next>' to proceed'
- Leave the box checked if you want to run MegaTune, the Configurator, or the Port Checker after completing the install, uncheck the box if you do not want to run them right away.
- MegaTune 2.25 is the tuning program itself.
- MegaTune Configurator is the program used to set up MegaTune (not MicroSquirt® itself) to display things like wide band AFR, different temperature units., etc. See this for more information.
- Port Checker will tell you which com port MicroSquirt® controller is connected to. To use it, run the Port Checker (be sure to turn on MicroSquirt® and connect it first). The port checker will poll each of the serial communications ports on your computer, looking for MicroSquirt. When it finds it, it will report "'** V2.88Embedded Code by B&G **'". However, it will continue to check the other ports, so you may have to look closely to find this on the screen. The comm port that successfully reports code version is the one you use for MegaTune (under 'Communications/Settings/Port). Always use a baud rate of 115200 with MicroSquirt.
- Click 'Finish'
- If you specified, MegaTune will open. A splash screen will appear, it will disappear after a few seconds, or as soon as you click on any part of MegaTune.
- You will find:
- On your desktop, an icon labeled:
- 'MegaTune 2.25' - to open MegaTune,
- In your Start menu, in the 'MegaSquirt' group (or whatever else you called it above) under 'Programs'.:
- 'MegaTune 2.25' - to open MegaTune (same as the desktop icon),
- 'MegaTune Configurator' - to edit the MegaTune configuration at any time (can also be accessed through 'File/Configurator' in MegaTune itself),
- 'Port Checker' - to check the serial communications port MicroSquirt® controller is connected to at any time,
- 'Uninstall MegaTune' in a folder called 'Uninstall', (to remove the MegaTune installation)
You are all set up and ready to connect to MicroSquirt! Note that MicroSquirt® must be connected and powered up to communicate with MegaTune on the laptop PC.
The MegaTune help file is on the web at: www.megamanual.com/mt28.htm
MegaSquirt® and MicroSquirt® controllers are experimental devices intended for educational purposes.
MegaSquirt® and MicroSquirt® controllers are not for sale or use on pollution controlled vehicles. Check the laws that apply in your locality to determine if using a MegaSquirt® or MicroSquirt® controller is legal for your application.
©2007 Bruce Bowling and Al Grippo and Lance Gardiner. All rights reserved. MegaSquirt® and MicroSquirt® are registered trademarks. This document is solely for the support of MegaSquirt® boards from Bowling and Grippo.